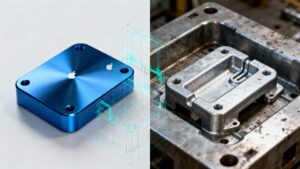
Designers love 90-degree angles; manufacturers fear them. We explain the physics of shrinkage, why “Zero Draft” leads to drag marks and stuck castings, and how to calculate the correct draft angle for VDI textures.
We see this note on 2D drawings every single day:
“Note: All vertical walls to be 90°. Zero draft allowed.”
To a designer in CAD, a perfect 90-degree corner embodies precision.
To a die casting engineer at Sureton, this specification signals a high risk of cosmetic defects, part damage, or a seized tool.
This isn’t about aesthetics versus convenience. It’s about fundamental physics. Draft angles aren’t a suggestion; they are a manufacturing imperative for a high-quality, cost-effective part.
If you force a “Zero Draft” design into a steel mold, you are setting yourself up for cosmetic defects (drag marks), bent parts, or the ultimate catastrophe: a casting stuck permanently inside the tool.
Here is the engineering reality of why Draft Angles are not a suggestion—they are a requirement.
1. The Core Challenge: Thermal Contraction & Radial Shrinkage
Draft is necessitated by one unavoidable fact: molten metal contracts as it solidifies and cools.
For common alloys like ADC12, this solidification shrinkage is roughly 0.5-0.7% linearly. Crucially, the geometry of contraction matters.
Radial Shrinkage: As a feature cools around a steel core pin or inside a cavity, it contracts radially inward, gripping the core with tremendous force—like a heated metal ring cooling onto a shaft. This creates immense static friction.
The Result: A perfectly vertical (0° draft) core face has no mechanical advantage to overcome this friction. During ejection, the part will gall or drag against the steel, scarring the surface. The force can even distort or permanently stick the part.
2. The Liberation Angle: How Much Draft is Enough?
Draft performs two functions: 1) It provides a mechanical advantage to overcome shrinkage friction. 2) It breaks the vacuum seal that can form between large, flat part surfaces and the mold (like separating two panes of glass).
General Guidelines (per side, for aluminum HPDC):
External Walls (Cavity): 0.5° to 1.0°. Metal shrinks away from these surfaces.
Internal Walls, Cores & Ribs: 1.5° to 2.5°. Metal shrinks onto these features, demanding more taper.
Depth Factor: For features deeper than 25mm, increase draft proportionally (e.g., +0.5° per additional 25mm depth).
3. The Texture Multiplier: Why VDI Specs Demand More Draft
Surface texture (e.g., VDI 24, VDI 30) creates microscopic undercuts that mechanically lock into the mold surface. The rougher the texture, the greater the locking force.
The Engineering Rule: The required draft angle is the sum of:
1. Base Draft (from guidelines above) +
2. Texture Draft (typically 1° to 2° per 0.01mm of texture depth, or Ra value)
Example: A VDI 30 texture (Ra ~4.8 µm) on an internal core might require: 1.5° (base) + (4.8 * 0.15°/µm) ≈ 1.5° + 0.7° = 2.2° minimum per side. In practice, we often recommend 3° or more for robust production and to accommodate variations in mold polishing.
Bottom Line: You cannot specify a texture without accepting its draft consequence. Our DFM report will calculate this for you.
4. When 90° is Non-Negotiable: The Engineered Solutions
If a true vertical wall is functionally critical, we engineer around it:
Side-Actions (Sliders): A moving mold section creates the undercut, then retracts before part ejection. Adds tooling complexity and cost.
Post-Casting CNC Machining: We cast with necessary draft, then machine the critical face to 90°. Adds per-part cost but ensures precision.
5. Partner on the Solution: From CAD to Confident Production
Draft isn’t a design compromise; it’s a manufacturing enabler. A well-drafted part yields better finish, higher consistency, and lower cost.
Struggling to fit draft into your assembly?
Send your STEP file to Sureton. Our DFM engineers will run a Draft Analysis. We will show you exactly where you need to taper, and where we can cheat the angles to keep your design looking sharp.


